Warning - long post with WAY TOO MUCH detail.
OK, this is one of those "Do We Need This" stories.
We replaced the battery "in-kind" 4 years ago. We took the battery to an O'Reilly's auto part store and had it tested. It failed and we simply purchased the same battery without thinking too much about it. Fast forward to the end of 2024 and we took the battery to an actual battery shop for testing. It seemed to be holding a charge but based on the age, and for reasons, we felt this was needed. Reasons we hope were unfounded but it they are not you will find another project soon. :)
| Local Battery Shop |
|---|
 |
The shop manager commented that the age of the battery was a usual concern but it tested fine and we should just keep an eye on it. He then said, "It will be fine for a 4 or 6 cylinder car." Wait wait what? We have a small block chevy 327 - AKA a V8. This brought up a few questions:
1. Why did we not notice this 4 years prior, or any time since March 2018?
Answer: we never needed to know???
2. Why did the previous owner (yep - that guy) install this size battery?
Answer: looking at where the battery is located we think we figured it out.
3. Why was the battery put in the trunk to begin with?
Answer: with the 327 engine installed there was no room under the hood.
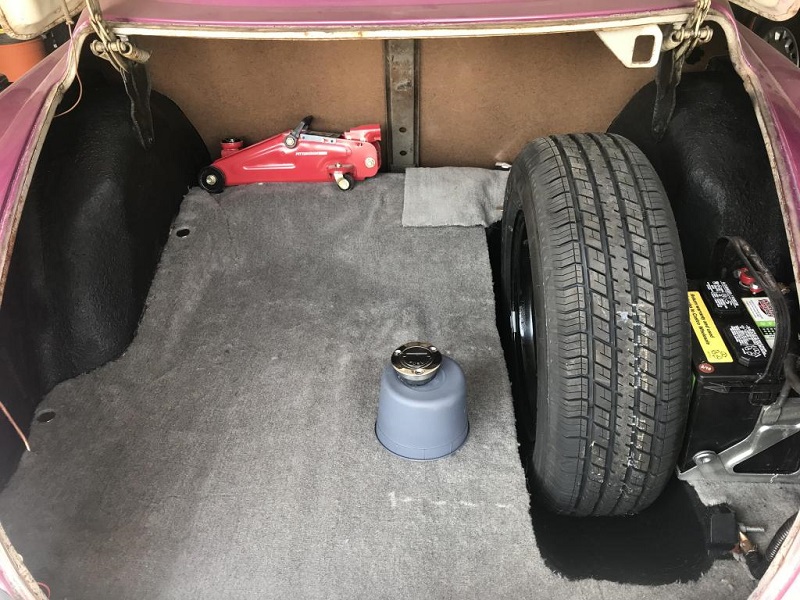
As you may be able to see the battery is located between the spare tire well and the passenger deck side panel. This area is not large and the battery box actually extends (barely) into the spare tire wheel well. We are interested in an Optima 34R battery (full size battery) and it will not fit in this location. There is however room in front of the spare tire or at least to the left of the wheel well. We do NOT want to encroach on the left were the jack normally sits.
Demo:
We then went into build/research mode. The order of operations were:
- Day 1: Clear out trunk contents. (Note: We began ordering parts on this day.)
- Remove the fuel fill cap and plastic casing.
- Remove the remote disconnect, pull back the trickle charger leads,and the battery.
- Remove the carpet (which we never liked). This is actually left over from the interior project.
- Reinstall the fuel fill cap temporarily as a safety precaution
- Day 28: Paint the following in flat black
- Back seat vertical support
- Border of trunk floor
- Area surrounding wheel well. (just in case the carpet lifts we will see black)
- This changed to painting the entire trunk deck.
- Fuel fill plastic casing (dirty secret = this is a cottage cheese container)
- Back seat divider fiber board.
- Drill mounting holes in the plastic remote post box (example but not actual box), AKA the "AutoBox"
- Position box in desired location, mark and drill mounting holes through trunk deck.
ISSUE: when drilling the mounting holes in the trunk deck we found that one hole aligned with the frame rail and a nut would not be possible. In conversation with friends they recommended a Rivet Nut. Wait wait what? Looking this up we immediately purchased one to adapt to the situation.
- Position box in desired location, mark and drill mounting holes through trunk deck.
- Measure everything again. This is an important step in any project
- It was at this point we did reconsider the entire project as we realized we could cut a hole in the passenger side of the trunk deck side panel and gain a little more room by boxing into the fender area. Our fear was this may interfere with the tire and that is NOT a mistake that would be acceptable.
- Install new carpet
Before carpet:

Repainted:

Day 42: Change of plans. Carpet is hard and we do not have the skill to shape the carpet to match the contours. We ultimately decided to mimic the original "Trunk Mat" by cutting the carpet to the original shape plus a bit for the passenger side of the spare tire.- Paint entire trunk deck . (flat black)
- Cut carpet to shape.
- Remove plastic bag from fuel tank opening and reinstall fuel fill cap temporarily for safety.
With carpet:
At this point we could stop, put everything back in, and call this project "Update to Trunk". Nothing electrical has truly happen and we call it a day.
Electrical Build:
Of course we did not stop. :)
We put some effort into the design and started building the actual battery layout. Here is a simplified view:

The goal is to install remote posts in the current battery location and then using the bottom of the posts (inside the AutoBox) connect all of the wiring. The AutoBox will hide all of the cables.
- Day 21-46 (parallel work):
Prep AutoBox - outside of trunk- Cut cable access hole in the front of the AutoBox and attach Thru wall fitting through hole.
- Install remote posts into the top of the AutoBox with the positive post towards front of vehicle.
- Install remote battery disconnect in rearward end of the AutoBox . Stand off mounts were used to allow display to sit flush'ish with box surface. We did allow the unit to project out just a bit for the visual effect and to gain just a little room inside the box.
- Mount Mega Fuse holder, with fuse, in bottom.
- Question of where to store spare fuse. We sealed both ends with shrink tubing and mounted the spare on the inside/back side of box with zip ties.
- Cut access hole on back side of box for trickle charger access.
- Additional small holes for zip tie that will hold the charger connection against the back of the box.
- Cut and route battery disconnect ground wire through the hole in rear of the AutoBox.
- Add ground sticker for the cool factor.
Here is a basic wiring diagram of what is going on inside the AutoBox.
- Add ground sticker for the cool factor.
- Day 60 (yes progress has been slow do to vacation and work):
Mark spot in protective hose for starter wire to enter.- Cut slot in hose (Had to do this part twice as we accidentally, stupidly, cut thru both sides of the nylon hose.)
- Pull string from slot to post end of hose. This will be used to pull starter cable later.
- Pull battery positive and negative cables through protected hose.
- Crimp lugs onto the AutoBox end of the battery cables
- Pull starter cable to post end of hose using the previously pull string.
- Needed to work hose towards final position while pulling cable.
- Cut and shrink tube 1/4" -20 mounting bolts. We basically plastic coated the entire bolt as it will be in the box were ALL of the power runs thru.
- Mount box to trunk floor
- Rivet Nuts used with 1/4" -20 bolts
- Attach remote disconnect ground wire to grounding lug towards rear of trunk.
- Attach trickle charger to the connection on the back side of the AutoBox.
- Tighten zip ties to hold the connection in place.
- Trim all cables so they coil inside AutoBox. The coils will allow slack so the top of the box to be opened.
- Posiitve battery cable to Mega Fuse
- Straight lug to fuse with no slack. Slack exist at battery connection.
- Mega Fuse to positive post
- Coil counter-clockwise with 90 degree lug on both ends.
- Starter cable to positive post
- Coil in lazy "S" pattern
- Attach with straight lug
- Negative battery to negative post
- Coil clockwise to align with post.
- Attach 90 degree lug.
- Posiitve battery cable to Mega Fuse
- Attach Positvie battery cable, Starter cable, trickle charger positive lead, and remote disconnect positive to positive post.
- Attach Negative battery cable, remote disconnect negative, and trickle charger negative lead to negative post.
- Reattach lid and close plastic box. We did all of the above connections with the "locking handle" in the wrong position. Because the plastic ammo can typically does NOT allow for the lid to be removed this caused the issue once we did remove the lid. As such, we had to undo all of the connections, move the locking handle to the unlock position and repeat all of the above.
- Use multimeter to check for continuity of positive and negative paths and to ENSURE they are not crossed. We choose to NOT use the Blue Smoke Test for this.
- While our original plan was to create leveling legs for the battery tray - we found it easiest to carpet the bottom of the new battery tray and set it on top of the axle hump.
- Fabricate a horizontal support that will extend from the back seat vertical support to passenger side of trunk.
- Drill and install rivet nuts in vertical support
- Drill holes in horizontal support (1 1/2" aluminum flat stock) for 1/4"-20, 1" long bolts
- Drill holes in horizontal support for brackets to battery tray.
- Mount rivet nuts in horizontal support for brackets
- Fabricate brackets from flat stock with holes that align with rivet nuts in horizontal support
- Bolt brackets to horizontal support.
- Day 63: Purchase new battery (FINALLY)
Not so funny story: Returning to the battery store we discovered they do NOT carry the battery we wanted. We found the Redtop 34 at an Autozone!
Of course when we got home we put it in the battery tray and then had to decide which way we planned to mount it in the trunk.
Single support front Dual support front (we are going with this) 

- Make battery tray bracket bolts with acorn nuts/washer on bottom and washer/nut/acorn on top.
- Time lapse the assembly of the battery tray/support bracket to the vertical support
- Feed battery cable hose between brackets of mounting assembly.
- Cut nylon hose to length
- Melt hose end to keep from fraying
- Add zip ties to hold hose to horizonal support
- put battery back in to continue filming
- Attach cable lugs
- Bend cables into coil and zip tie to hold shape
- Attached battery cable lugs to quick release battery terminals.
- Disconnect battery ground for safety.
- Get fire extinguisher ready at the AutoBox. (again for safety)
- Attach battery cables to battery.
- Connect the AutoBox negative ground cable - This IS the "smoke test"
- Test remote disconnect. (dome light will indicate if power is on
- Day 70: Fabricate bracket for jack and jump starter
- First make a template from a wire coat hanger. This was WAY easier that using a tape measure or trying to bend the aluminum in place.

- Then cut, drill, bend, cuss, and bolt together the bracket on the work bench

- First make a template from a wire coat hanger. This was WAY easier that using a tape measure or trying to bend the aluminum in place.
- Reload trunk items in this order (for video animation)
- Jack
- Jump Starter
- Fire Extinguisher
- Tool Bag
- Spare Tire
- Fuel Fill Cover
- Gas Can
- Credit sequence:
- Trunk light "mysteriously" pops on. (use cheap maglight for this "effect"
- Bonus Reel
- Rando pics of this project work space. (kitchen, dining, garage, workbench)
- Slide into frame ala PowerPoint style
- Making of Reel (imitate video splash screen)
- montage sequence of before/after photos
- montage sequence of before/after photos


| YouTube Video for this project! |
And here is an image of the completed project.
| Click to see full size image |
 |
| Oddly enough, and a total fluke, everything we put in the trunk is red. These were bought over time with no plan in place. |

Optional items: (All items listed can be completed AFTER this project is over)
- Carpet sides of trunk to the rear of the wheel wells. (because we have extra carpet)
- Replace fuel fill plastic case (AKA cottage cheese tub) with something better.
- Paint can (with fill cap above can lid)
- Fuel can (to cover fuel fill completely)
- Tool box (open top to access fill cap)
- Add stickers to AutoBox. Things like:
- I am silently judging your wiring
- YouTube Electrician
- Danger: DO NOT TOUCH This will kill you and hurt the entire time you are dying
Expenses:
| Item | Price |
| Optima Battery | $279.99 |
| Battery Tray | $36.50 |
| All thread, washers, bolts, flat stock aluminum | $83.98 |
| Carpet knife, glue, additional | $30.30 |
| Carpet | $28.80 |
| Plastic ammo can | $0.00 |
| PVC fitting | $4.00 |
| Nylon hose | $17.99 |
| 1/0 cable | $87.99 |
| Crimper cutter | $46.07 |
| Rivet Nut tool (where has this been our entire lives) | $39.98 |
| Cable lugs | $9.70 |
| MEGA fuse holder | $5.49 |
| MEGA fuses | $8.99 |
| Battery terminal connectors and "Terminal Protector" | $9.98 |
| Remote post | $8.79 |
| Way cool / awesome looking battery upgrage | Priceless |
| Total | $698.55 |
| (with some rounding errors) | |
Misc Info: (for the stat geeks)
| At the end of the project, this was the file count. Most of the files were for the YouTube video... |
|
|

Thank you Credits:
To all our friends who suffered all of the talk about the project. For their input on what to do and not punching us after going on about it for 3+ months!
We are now in a support group for this, the groups name is "On And On And On"!
To family members for their love a support: Ally for her help on the video production. Abby for being beautiful and perfect!
Thanks to the YouTube channel GT1900garage for the inspiration in making the video for this project. This guy does AMAZING work and his video production is stellar.
To the YouTube channel who made us believe we could work on the ChevyBaker at all, Bad Obsession Motorsport. We (me and my son Matt) are addicted.
And lastly, to our music inspiration! We don't know how we could have made it without this playing in the background...